

Introduction
This article walks through installation of the Falcon Sensor on a Mac.
Prerequisites
Installing the CrowdStrike Falcon Sensor requires elevated privileges. For supported versions of MacOS see the CrowdStrike FAQs
Falcon Customers refer to the install guide available in the document section of the console
Browser Dependencies
CrowdStrike currently supports the Google Chrome browser for use with the Falcon UI. We support the current release of Chrome as well as the prior two major versions. Other browsers may work, but we do not support other browsers at this time.
Installing the Falcon Sensor for Mac
1. Download the sensor installer from Hosts > Sensor Downloads. Use the Chrome browser..
Navigating to sensor downloads
2. Copy your Customer ID Checksum (CID) from Hosts > Sensor Downloads.
CID Location in Host App
Run the sensor installer on your device in one of these ways:
Double-click the .pkg file.
3. Run this command at a terminal, replacing <installer .pkg> with the path and file name of your installer package.
sudo installer -verboseR -package <installer_filename> -target /
Change in System Preferences
1. When prompted, enter administrative credentials for the installer.
1. For macOS Mojave 10.14 through macOS Catalina 10.15, after entering the credential for installation, you’re asked to approve the kernel extension on each host. The Apple message on the host identifies the CrowdStrike kernel extension as a blocked system extension signed by CrowdStrike Inc.
2. System Extension blocked
In the message, click Open Security Preferences. If the message no longer appears on the host, click the Apple icon and open System Preferences, then click Security & Privacy.
3. On the General tab, click Allow to allow the CrowdStrike kernel extension.
1. Note: This approval prompt is only present in the Security & Privacy preferences pane for 30 minutes after the alert. Until the user approves the kernel extension, future load attempts will cause the approval prompt to reappear but will not trigger another user alert. If you don’t see this approval option, restart the machine to get the approval prompt again.
2. Kernel extension approval is required only once. If the Falcon sensor is subsequently reinstalled or updated, you will not see another approval prompt.
2. Run falconctl, installed with the Falcon sensor, to provide your customer ID checksum (CID).
1. This command is slightly different if you’re installing with password protection (see documentation).
2. In this example, replace 0123456789ABCDEFGHIJKLMNOPQRSTUV-WX with your CID.
sudo /Applications/Falcon.app/Contents/Resources/falconctl license 0123456789ABCDEFGHIJKLMNOPQRSTUV-WX
For macOS Big Sur 11.0 and later, after providing your CID with the license command, you will be asked to approve the system extension on each host:
In the message, when asked to filter network content, click Allow.
When the System Extension Blocked message appears, click Open Security Preferences.
On the General tab, click Allow to allow the Falcon system extension. You may need to click the lock icon to enable you to make security changes. If you do not approve the Falcon system extension when prompted on the host, run the falconctl load command to load Falcon again and show the prompts on the host for approval:
sudo /Applications/Falcon.app/Contents/Resources/falconctl load
4. Grant Full Disk Access (detailed instructions in product guide) – Beginning with macOS Catalina, Apple requires full disk access to be granted to CrowdStrike Falcon in order to work properly. This is a Catalina requirement by Apple for files and folders containing personal data. This requirement is applicable to all 3rd-party software which need to access files across all users of the machine (e.g. backup software).
1. Click the Apple icon and open System Preferences, then click Security & Privacy.
2. On the Privacy tab, if privacy settings are locked, click the lock icon and specify the password.
3. In the left pane, select Full Disk Access.
4. For macOS Big Sur 11.0 and later, in the right pane, select the Agent check box:
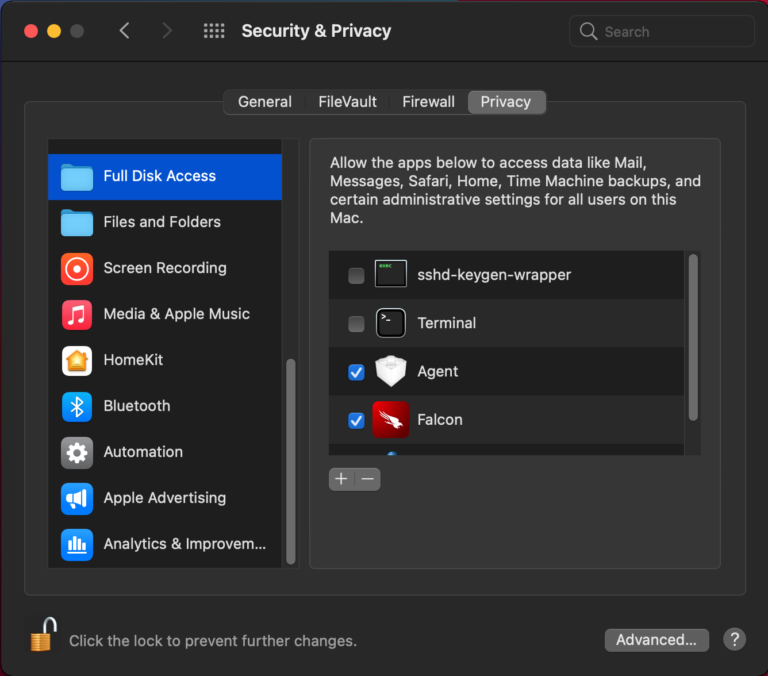
5. Full Disk Access
6. For all macOS versions, in the right pane, click the plus icon.
7. In finder, find Falcon in the list of applications (no “Agent” is required).
8. Click Open and then click Quit Now:
Click the lock icon to re-lock privacy settings.
After installation, the sensor runs silently. To confirm that the sensor is running, run this command at a terminal:
sudo /Applications/Falcon.app/Contents/Resources/falconctl stats
The output shows a list of details about the sensor, including its agent ID (AID), version, customer ID, and more.
MacOS Falcon Sensor Deployment
What is falcond?A lot of searches for “what is falcond” are landing on this page. falcond is the MacOS sensor for CrowdStrike antivirus software. The d is for daemon, a process that runs in the background, and falcon is the name of the antivirus software. Update (December 2021) A good semaritan has updated my script to work with the new macOS Falcon Sensor version (6.32 as of writing). I updated this article to reflect the changes. Overview CrowdStrike Falcon is a leading endpoint protection platform. The CrowdStrike platform offers increased control, visibility, and protection as well as humans on the back end to make sure that nothing slips through the cracks. In a large environment, it is advantageous to automate the installation process as much as possible. The Windows sensor installer has the Customer ID built-in, but the macOS installer does not. The Falcon installer is straightforward enough for employees to use, but licensing it requires running a command in Terminal (shell). Easy for some, but Terminal can be a scary place for others. Had I sent the Falcon install instructions (including the licensing command) to the masses, there would have been a lot of partial installs. I knew that there had to be a better, easier, way to deploy Falcon on the Macs, so I started hacking. Hack the pkg I’ve never snooped around package (.pkg) installers before, but it was easier than I thought to hack. You will need XCode installed to use the pkgutil command. 1 – Expand package In order to edit the scripts within the package, you need to expand it using the pkgutil command:
pkgutil --expand FalconSensorMacOS.pkg /tmp/FalconSensorMacOS.unpkg2 – Edit postinstall scriptsNext, you will need to edit two files (the same script in two locations):
- /tmp/FalconSensorMacOS.unpkg/sensor-kext.pkg/Scripts/postinstall
- /tmp/FalconSensorMacOS.unpkg/sensor-sysx.pkg/Scripts/postinstall
Note: if you are navigating to the files in Finder, you will need to right click on the sensor-kext.pkg and click “Show Package Contents”. The postinstall script gets run towards the end of the installation process. We need to edit the file in two places: 2.1 – Assign license key to VALUE variable First, locate the readManagedProfileKey function towards the top of the file (line number 15 as of writing). Add your license key to line 4 (keep the quotation marks):
12 13 14 15 16 17 18 19 | function readManagedProfileKey() { if ! VALUE=$(/usr/libexec/PlistBuddy -c "print :$1" "$MANAGED_FALCON_PLIST" 2>/dev/null) ; then VALUE="0123456789ABCDEFGHIJKLMNOPQRSTUV-WX" fi echo "$VALUE" } |
2.2 – Add licenseSensor function
Second, add the licenseSensor function (including the function call) above “loadSensor” (lines 107-112 below):
107 108 109 110 111 112 113 | function licenseSensor() { "$CS_BIN_PATH/falconctl" license 0123456789ABCDEFGHIJKLMNOPQRSTUV-WX } licenseSensor loadSensor |
Be sure to replace the example license key with your own.3 – Re-package filesBack in Terminal, flatten (i.e. re-package) the files:
pkgutil --flatten /tmp/FalconSensorMacOS.unpkg FalconSensorMacOSWithID.pkgThat’s it! The user will still need to allow the computer to enable the system extension, but they will not need to run the licensing command in terminal. Automating the hackI wrote a script to automatically: Expand the packageEdit the postinstall scriptsRe-package the files You can find the script on https://github.com/kguay/falcon-license. The script needs to be run on a computer running MacOS with XCode installed, since it requires the pkgutil utility. 1. Download the MacOS Falcon installer from the Falcon management web portal.2. Download the license-falcon script from https://github.com/kguay/falcon-license3. Run the license-falcon script the path to FalconSensorMacOS.pkg and your Customer IDFor example:
sh license-falcon.sh FalconSensorMacOS.pkg <customer_id>


